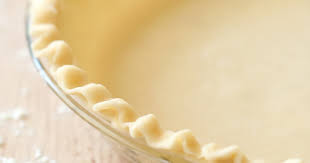
I never understood the phrase “easy as pie” even though I use it often. Pie is not always easy – especially if you are making your own crust. But it can be! I am genetically predisposed to cheapness in some things so it bothers me to pay $4.99 for a box of 2 pie crusts – even if they are dependably delicious.
So I set out every pie crust recipe I own and will compare five of them, along with my experiences with each. They are:
- Crisco Pie Crust
- Miss Betty’s Never Fail Pastry
- Mom’s Pie Crust
- Crumb Crust
- Cookie/Graham Cracker Crust
I will tell you straight up, that Mom’s crust is the best of the first three. Now if you knew Miss Betty, please don’t be upset with me. I really do prefer Mom’s crust for several reasons. I’ll explain as we go.
Crisco Pie Crust
This is a foundational start to many cook’s first experiences with pie crust. They put the recipe right there in the packaging to make it easy for you to find. Sure, this crust will hold your pie together no matter yummy filling you use, but this crust tastes like flour and Crisco. I found it to be the least tasty of my three basic recipes shared here. However, I included it today because I found the directions to be helpful. So read them, learn from them, and then use one of the other recipes below.
Ingredients:
2 cups all-purpose flour
1 tsp. salt
¾ c. well-chilled Crisco
4 to 8 T. ice cold water
Directions:
- Blend flour and salt in large bowl. Cut shortening into flour mixture using pastry blender or fork until coarse crumbs form. Stir in just enough water with fork until dough holds together.
- Divide dough in half. Shape into ½ – inch disks. Wrap in plastic wrap. Chill 30 minutes.
- Roll out each disk 2 inches larger than pie plate on lightly floured surface. Line pie plate with 1 unbaked pie crust. Fill crust according to recipe directions. Top with remaining unbaked pie crust. Bake according to recipe directions.
Makes 2 9-inch crusts.
Betty Melton’s Never Fail Pastry
Please forgive me Miss Betty, but when I made your Never Fail Pastry, well, it failed. I feel certain that it was my inexperience in the kitchen, but this crust was too thick, too tough, and starting with 4 cups of flour, just huge for my little kitchen. However, Miss Betty was one of the absolute best cooks of anyone I ever met – and I ate a LOT of things she made as well as yummy goodness made from her recipes, so if you are a more experienced cook than I, give this one a try. It has all the right ingredients. Let me know what you think after you try it.
Ingredients:
4 cups flour
1 tsp. baking powder
1 tsp. salt
1 T. sugar
1 3/4 c. shortening
1 egg, beaten
1 T. vinegar
1/2 c. cold water
Directions:
- Combine dry ingredients.
- Cut in the shortening.
- Stir in remaining ingredients.
- Divide into 4 pie shells.
- Shape into balls and store in the refrigerator for up to 2 weeks.
When you are ready to use them, Bake at 350° F. It browns quickly, so keep an eye on it while it bakes.
Note: Miss Betty recommends that if you halve the recipe, still use one egg.
Mom’s Pie Crust
This recipe, it turns out, is the one with which I have experienced the most success. The amount is enough for 2 crusts and it is still tasty and holds a pie very well. I am one of those people that likes pie crust. If I leave it on my plate, it is only because I am always watching my carbs. And this recipe has all the necessary ingredients for tastiness without overtaking my refrigerator while I try to figure out what to do with four single or two double crusts.
Ingredients:
2 c. flour
2/3 c. Crisco All-Vegetable Shortening
1 tsp. salt
2 tsp. sugar
2 T. water (Begin with 1 Tablespoon and see if you still need a little extra.)
Directions:
- Cut flour and Crisco together.
- Add water and stir with a fork until it doesn’t stick to the sides of the bowl.
- Turn onto a floured surface. Roll just a bit and then wrap in plastic wrap.
- Place in the refrigerator for 10-15 minutes
- Remove from refrigerator, discard plastic wrap and roll out to 2 inches larger than your pie plate.
- Note: Some pies require that you pre-bake the crust.
Notes: Mom says that she never had time to put her crust in the refrigerator so she just made the crust as soon as it was all mixed and ready to roll onto the floured surface. When employing this method, I experienced some tearing on the edges as I rolled. When I asked mom about this she explained the remedy for this was to put it back in the bowl and add a little more water. This usually fixed the problem for her. You try either or both and let me know your results.
Copycat Sandwich Etc. Pie Crust
There are still other crusts and this next one is one you will definitely want to try. It’s the one I call a “crumb crust.” It is not made from cookies or graham crackers, but still has that crumb-like texture. This is a copycat recipe from the little sandwich place in my hometown that I mentioned in the Strawberry Pie recipe. This is a “delicate” crust, meaning you will probably not be able to pick up a piece of pie and eat it with just your hands. This delicacy will crumble and you will end up licking your fingers – and not in a good way.
Crust for an 8-inch pie plate: (You will love this! No rolling necessary!)
Ingredients:
1 1/2 c. flour
1/2 c. canola oil
1/4 c. milk
1/2 tsp. Truvia or other sugar substitute OR 1 tsp. sugar
1/4 tsp salt
Directions:
- Mix and press into your pie pan.
- Bake at 400° F for 10 minutes. Remove and allow to cool to room temperature. I usually put this in the refrigerator to speed the process.
Note: I use a deep dish 9-inch pie plate so I add 1/4 c. of additional flour and 1 Tablespoon of extra canola oil.
The nice folks at Sandwich Etc. have discovered a simple, yet delicious way to create a crust that works as well with sweet pies as it does with quiche. My sister used it for a brunch quiche and reports that it was delicious and paired well with the savory quiche ingredients. It is also bomb-diggity as a cradle for their Strawberry Pie.
Cookie and Graham Cracker Crusts
I prefer the name brand of these cookies. If you love someone enough to make them a pie, you love them enough to use name brand cookies for the crust. So I will call them by their trademarked name. No, they are not giving me anything for this endorsement. I really do think you should always use Nilla Wafers. They make the tastiest crust and are pretty delicious just for eating. If you only have Graham Crackers, add 2 T. of sugar to the mix for flavor.
Ingredients:
1 1/2 c. Nilla Wafer crumbs
5 T. butter, melted
2 T. sugar (only if using Graham Crackers rather than Nilla Wafers)
Directions:
- Place Nilla Wafers in the food processor and pulse the blades until you have a fine crumb. Measurements are great, but if you find that you’ve chopped up a little too much, go ahead and include them or save them in a baggie until the next time you need them. They freeze very well.
- Melt the butter and pour into the crumbs in y our pie plate. When the crumbs are well-moistened press them into the plate and up the sides until evenly distributed.
- Bake at 350° F. for about 10 minutes and allow to cool completely before filling.
As always, I invite you to try these recipes and share your insights.
